CRKT M16-01KZ Knife Review - Perfect Camping Knife?
 When most individuals think of a camping knife I believe they incorrectly jump into thinking they need either a tactical survival knife like the SOG Seal Pup or a Bush knife like the Mora. While both these styles have their place in the outdoors, I believe that for most common campers they are too large and unwieldy as a primary camping blade. Most of you will not be splitting wood, building structures, creating spears, digging holes, signaling for help, or slaying bears with your knife. Years of camping experience has taught me that the most common applications for a camping knife are cutting rope, preparing food, and creating tinder and kindling for a fire. Further, we only have so much room to pack or carry with us while camping and so I have found the size and weight of an item plays an important role in my decision whether to bring it or not. That being said, each camping situation is different and a person hiking 7 days in the back country will have more demanding requirements than someone who is doing a weekend trip at a public camp site. In other words your mileage may vary and I do believe a survival knife is a critical item to bring along in addition to a camping knife if you may be more isolated or at higher risk of finding yourself in a precarious position.
If we assume the primary role of a camping knife is cutting rope, preparing food, and as an aid to start a fire; here are some of the characteristics I look for when choosing one: 1.) large enough to fit comfortably in the hand, yet small enough as to minimize weight and maximize portability. 2.) Spear point design - which allows for detail work using a strong sharp tip, and a modest belly for slicing and cutting. *Note: a drop point blade would be a close second. 3.) Affordable, I don't know how many times I have seen a knife lent to another person and never returned, or in the rush to pack up camp a knife is left behind. 4.) Straight edge design over a serrated blade. This allows maximum usage of the blades belly and is much easier to resharpen. 5.) Is durable to modest abuse and rust resistant. 6.) Is composed of a steel that is easily sharpened and retains an edge well. All of these things led me to the CRKT M16, but is it the perfect camping knife?
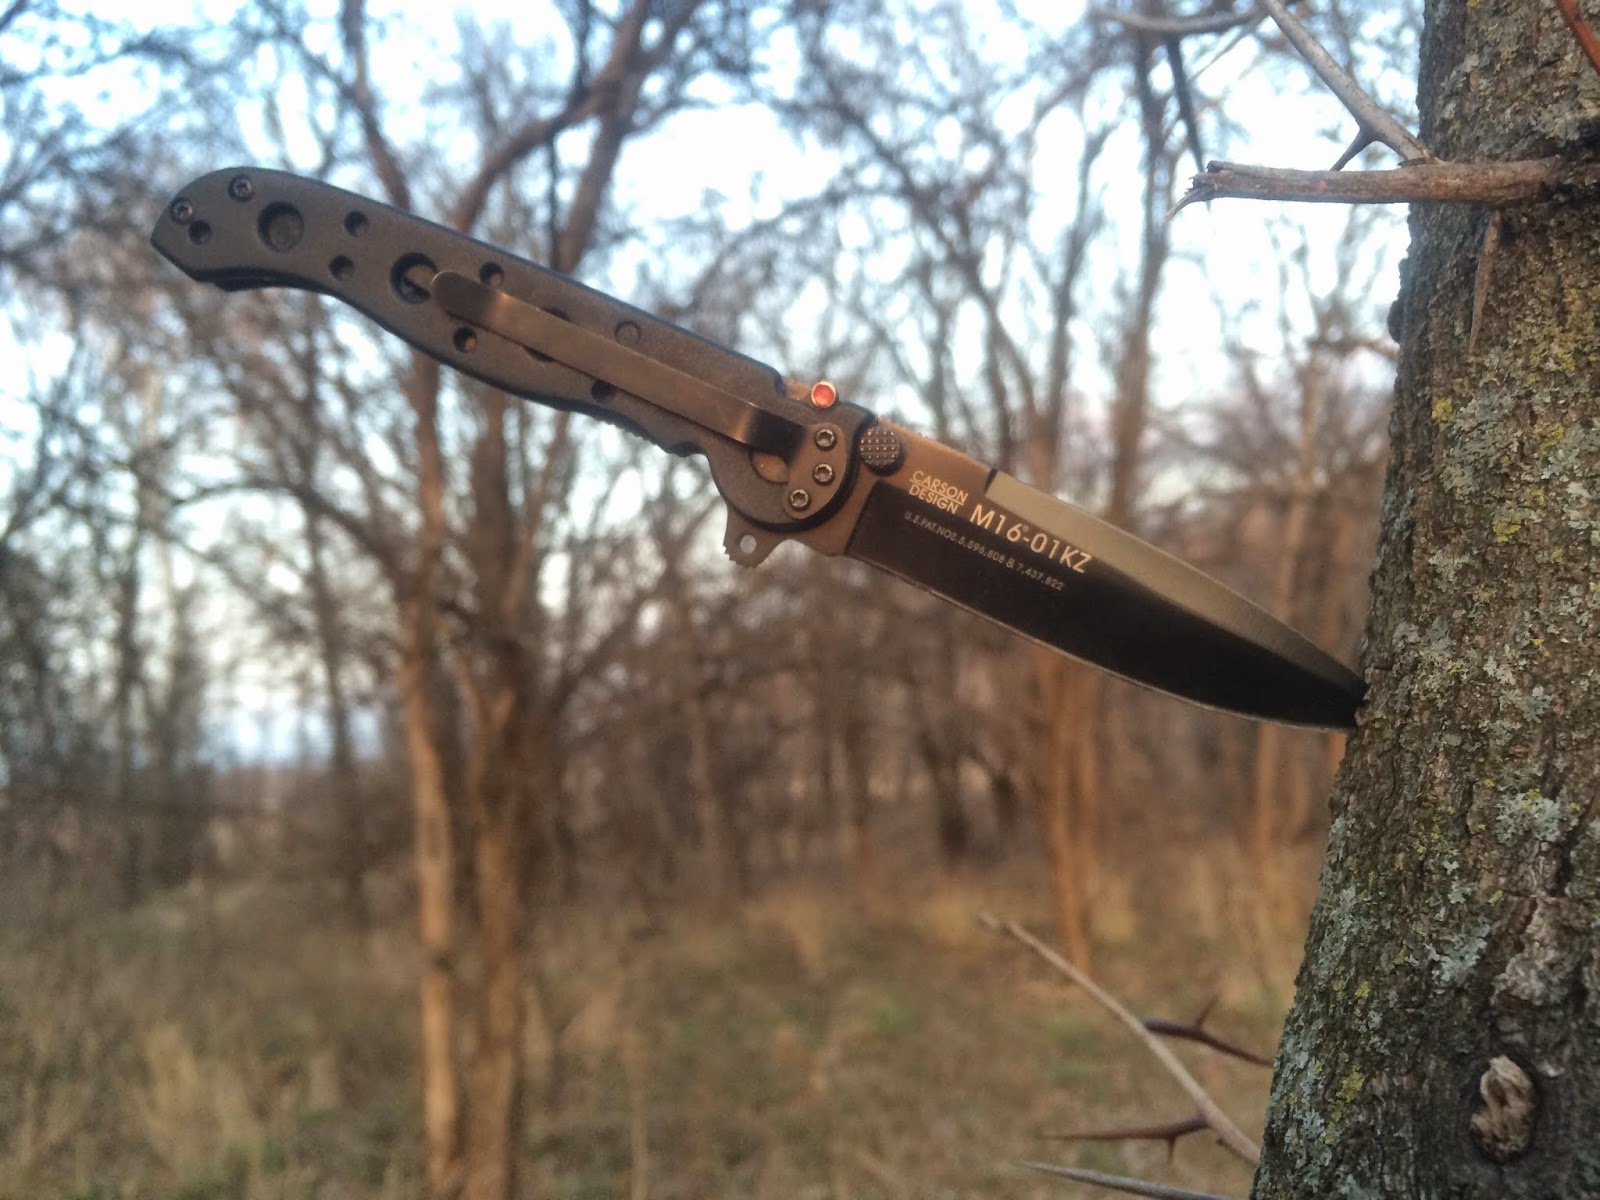
The Good: The M16 design has some very strong attributes in its favor. First, ergonomically it fits wonderfully in my hand, being a folder makes it compact (open length is 7"closed is 4"), and at 2.3 ounces it is light weight. Secondly, the blade design is perfect for food preparation and other detailed tasks and strong enough so you don't worry about damaging the tip or folding over the edge when preforming more rigorous tasks. Third, it is very affordable and if I lost one or irreparable damaged it I wouldn't shed a tear. MSRP is $49.99 but can easily be found in the $24 dollar range at several retailers. Fourth, the guard design allows for rapid one hand deployment when folded and once open provides modest protection to prevent your hands from slipping onto the edge. Fifth, the steel, 8Cr15MoV very easily sharpened and resistant to wear and rust.
The Bad: Lets first start with the steel, while 8Cr15MoV is very easily sharpened and resilient, I would classify its edge retention as moderate. This means that if you plan on doing a lot of heavy cutting, say on cardboard or wood, you will quickly wear down the edge and it will need to resparpen--but again it is a very easy knife to resharpen to a razor edge. Secondly, some may find the grip marginal and thus I am putting this in the bad category but I feel the ergonomics overcome this for me. Third, and the big one for me, I find the locking mechanism weak and prone to lockup. The M16 is a liner lock design with an AutoLAWKS safety mechanism. Therefore the knife is designed to have a greater resistance to unexpectedly collapsing while in use and thereby adds the safety to protect your hands. This is great and I would love that about the knife if only it was executed more precisely. Allow me to explain. Over the past four years I have owned three M16 knives, the first I lost and the second I sent back to the factory due to malfunction with which they sent me a new knife. That malfunction was due to me placing an increased pressure on the blade of the knife which caused the locking system to seize or permanently lock up. In other words, while it did protect my hands, the locking system caused the blade to stay in the open position. You were unable to close it. CRKT has since sent me what is now my third and I have had this problem with it again. Instead of sending it back I just take a pair of pliers and squeeze the liner lock so I can close the blade again. No time has it done this under normal use but when higher stress is applied the knife has locked up five or six times.
Conclusion: For many years I thought the CRKT M16 was close to the prefect camping knife. The shape, ergonomics, price and size matched perfectly with my needs. But to answer the question, is it the perfect camping knife? No. But then again almost all gear is a combination of compromises and advantages. The M16 has a lot going for it but the steel and locking are subpar yet this is balanced with its affordable price. Compromise. I still take the M16 with my camping as I have a love for its feel, but it now comes as a secondary blade not a primary and in those extreme size and weight circumstances it does not come at all. I still like the knife, but it is not perfect. I would still recommend it as a light EDC or Camping knife but for those looking for something capable of more rigorous use there are better options out there. Verdict: 7/10.


8 Comments:
Post a Comment